Installation
On deck. Mast up. No rigging removed.
As long as you have an unobstructed stay from the turnbuckle connection to the top of the mast, you can install a 3DFurler yourself — on the water or on the hard.
Under 2 hrs
Typical install
Zero
Rigging removed
6 oz
Per foil section
12″
Foil sections
The sequence
Tack to masthead, one foil at a time.
There is no need to disconnect the forestay. Assembly with the mast up is best. Because the SlideLock foils are only 12 inches long and weigh less than 6 ounces, you can push them up and hold them as you insert more.
Before you start
Check the stay is unobstructed and tensioned
You need a clear run from the turnbuckle connection — swage or compression — to the top of the mast. Check stay tension with a gauge first; a LOOS gauge is what we use. See forestay tension.
At the head
Fit the top assembly and the FirstFoil
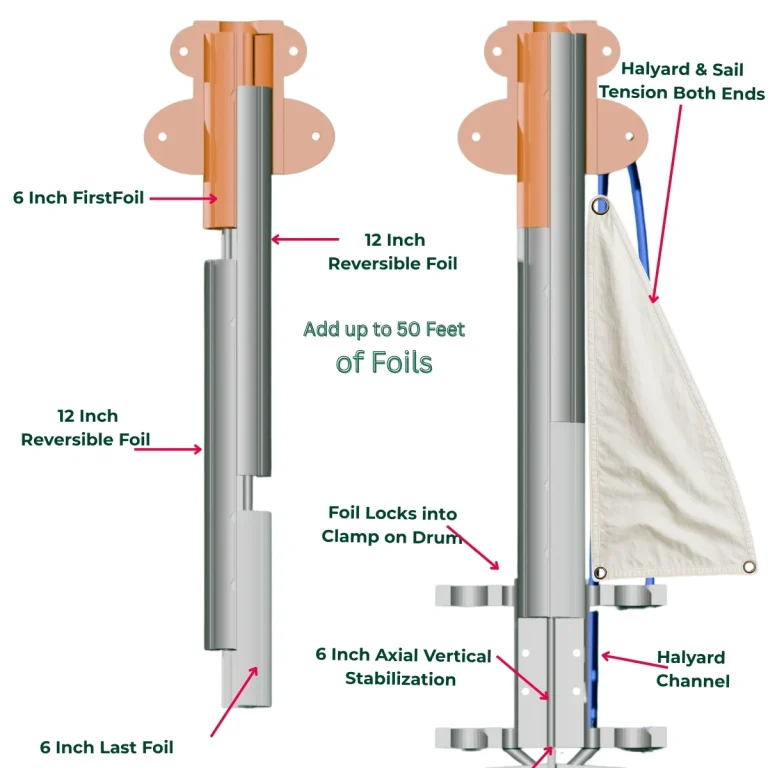
The top assembly slides over the stay and the 6 inch FirstFoil feeds into the Docking Channel. Halyard and sail tension are taken at both ends, so nothing loads the ship’s rig.
Up the luff
Push the 12 inch foils up, one at a time
Each foil is under 6 ounces and reversible, so there is no wrong way round. Slide one up, hold it, insert the next. Add up to 50 feet. No cutting.
At the drum
Lock the last foil and tighten
The 6 inch last foil locks into the clamp on the drum so the whole stack turns together. Six inches of axial vertical stabilization keep it true, and the halyard channel runs the line clear of the foil.
Watch it close
The drum clamps on above the turnbuckle.
No rigging comes apart. The two halves close around the stay you already have, sitting above the turnbuckle, and from then on the whole assembly turns as one piece.
Everything below the drum — turnbuckle, toggle, chainplate — stays exactly as it is. That is the difference between a deck-level afternoon and a booking at the yard.
Before and after
Three things worth doing properly.
Rigging
Check forestay tension first
A straight, evenly tensioned forestay is what makes any furler turn smoothly. Lateral curvature in the wire creates friction inside the foil.
Line
Lead the furling line
Where the line leaves the drum and how it is led aft decides how the system feels from the cockpit.
Loads
Understand the vertical loads
Why the assembly does not float up in a seaway, worked through with the numbers.
Stuck halfway through?
Our team is a phone call away, and we have talked plenty of people through this from the bow.